I may catch hell from some people about this post. It’s predictable.

After the jewelry cabinet, I really wanted to do a couple of smaller projects. I’ve had some lumber I picked up at an estate sale that I’ve hung onto for special occasions – one piece was the figured maple for the jewelry cabinet. Another piece was dark… I though maybe it was Texas Ebony, but I was way off (as you’ll see). I decided to build a humidor.
Yes, I smoke the occasional good cigar. (NOT cheezmo cheap stinkers.) Yes, I know I probably shouldn’t, but something else is far more likely to kill me before that does (like inhaling wood dust… more on that to follow).
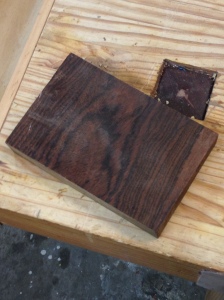
The wood was very dark, dense, and close-grained. It had a slight lateral twist that had to be removed, but was too big for my little jointer by about two inches. So I set up a sled for the planer, shimmed under the warp, and ran it through several times until the first side was flat. Then flipped the board, and planed the other side to parallel.
Imagine my surprise when this was how it came out of the planer.
 After scratching my head a while, I decided it might be cocobolo… also a wrong guess. So I drove a piece over to the Schmott Guys at Woodcraft, and asked. It turned out to be Bocote – something I was completely unfamiliar with. It’s a central/south American hardwood. Very dense and heavy (Janka hardness 2,010 lbf). Its hardness is similar to rock maple, but that’s where the similarities end. It’s very, very dense and heavy. But it was an absolute joy to work with.
I had decided to not make this a strictly-hand-tool project, because I wanted to get it accomplished in the short term, and I was unsure about handling this wood without some machine assistance. This was the most amazing wood I’ve ever worked with – it machined flawlessly, almost like working plastic. Like Bubinga, but smoother. After planing or sawing, it only required a light touchup with 220 grit sandpaper to bring out a flawless surface.
The box is very simple: rabbeted joinery, with an inset plywood bottom. I resawed the top into a pair of bookmatched panels.
Once completed, a pass across the table saw cut the grooves in the edges for the inlay. The inlay strips are Gaboon Ebony (which is outrageously expensive, but I was having fun).
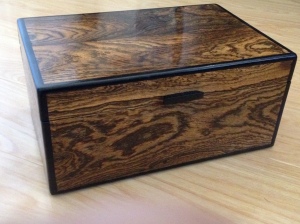
When the inlays were in place, I hand-planed it all flat, and rounded the edges with a block plane. A pass through the band saw cut the lid free. Hinge installations were pretty simple – I decided not to use traditional corner hinges, because strength wouldn’t be a major issue. These brass hinges are simple insets, and stop at 110°.
 The handle is a small cutoff of ebony, glued in place. The lining of the humidor is Spanish Cedar. This is a critical issue: Spanish Cedar has a cellular structure that retains moisture and helps prevent mold and rot, without being so aromatic as to change the taste of the cigars. The lining should be replace every few years, so the only place where it’s glued in is a couple of tack-spots on the lid and the bottom. The other pieces are just cut tightly to fit, and when the box is seasoned, the cedar swells enough to hold them tightly in place. The upper tray is a simple construction of Spanish Cedar as well.
Today’s Lesson: When you cut or sand Spanish Cedar, wear a damn respirator. Cedar is a tremendous allergen, and I sneezed for three days. Lesson noted.
I decided that this project would be a good time to experiment with something I’ve been wanting to try: I gathered up my courage and attempted French Polish.
Instructions for this are everywhere on the internet. Most of them are very similar, but I had a clear set of instructions from a class at Woodcraft (thanks, Howard) that I followed for this first attempt. Like hand-cut dovetails, I think there’s a lot more made of the process than it really merits. It’s labor-intensive, but not that difficult. Follow the directions for the shellac cut, the fiber content of the pad, and be patient and prepared to do a lot of rubbing. Having said that, I wouldn’t really want to do an irregular surface or inside corners. I can’t even figure out how that would work.
But this was the perfect project to try it out. It took about three days off and on to finish the polish, but I’m glad I tried it. And now I’m prepared to do it on something more challenging next time.
The humidity for cigar storage should be about 65-70%. I added a small Xikar digital hygrometer and humidifier inside the top lid. To season a humidor, rub down the inside with a pad dampened with distilled water 3-4 times over the first day, then close the box and let the humidity stabilize over the next 48 hours. mine is holding at about 69% at the moment.
My thanks to Scott at Woodcraft for one great piece of advice: Add one seal coat of shellac to the inside of the box before the cedar lining. That keeps the box itself from absorbing the water while it’s stabilizing, and it will go much faster. It also helps keep moisture of the joinery.
This was a great small project, and not at all difficult. I may try another one with more complex inlay and simpler wood grain next time.
More to follow. Stay tuned.
Ross Henton
February 2014

Looks great.
Reblogged this on Menuiserie Ebénisterie des Yvelines.