I had hoped to blog more thoroughly on the construction, but it wasn’t to be. Work, travel, a minor injury, the holidays, and flu season all conspired against me. I was able to take some construction photos and I’ll attempt to work backwards as I can.
This started out as the ‘mystery’ project when a friend looked at the casework and said, “That can’t possibly be a jewelry cabinet. It’s enormous.”
Well, my wife-unit (Cathrine) seems to accumulate a lot of jewelry. She wound up with necklaces and bracelets stored in their original boxes, stuffed into drawers, and two or three smaller jewelry boxes which contained different pieces. It turned into a jumble of frustration. I decided to end it once and for all with a single wall-mounted cabinet, with room for everything and some room to grow. And yes, it’s big.
Casework:
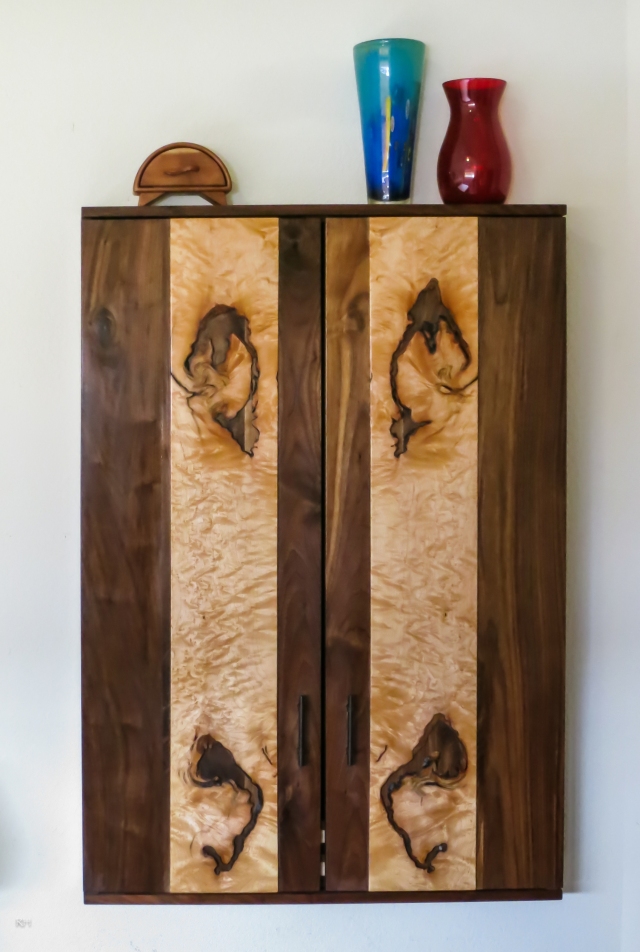
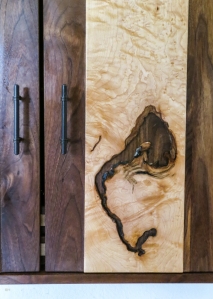
The cabinet is 28″ x 40″ x 5″. The casework is walnut, with the two maple panels overlaid across the doors. After debating what to do with the two pieces of maple with their amazing ‘keyholes’, I decided to use them as an overlay for darker wood, and let the walnut show through the openings. The hinges are european-style Blum 110° soft-closing hinges. All the internal hardware was originally brushed satin, but a couple of spray coats of Behlen dark walnut toner brought them to the bronzed color I wanted. The project was a combination of machine and hand work – most of the long cuts (and thicknessing) were by machine; all the joinery is hand work.
Problem #1: One of the doors warped just slightly between construction and completion. Fortunately, the hinge adjustments work extremely well, and allowed me to compensate for it so that it’s *just barely* visible if you look directly at the edge of the door from the side.
The cabinet is hung to the wall with two 24″ french cleats in its inset back – one at the very top, butted against the top of the cabinet; the second about halfway down. I was slightly more comfortable with the weight distribution, and didn’t want the bottom end of the cabinet to ever pull away from the wall.
Joinery:
The case is dovetailed, with a walnut plywood back inset 1/2″ to make room for the french cleats. I believe my dovetails improved considerably over the course of the work. My instructor at Woodcraft told me once that he allows 30 minutes per drawer for dovetails when doing time estimates for production. I ain’t that fast, and probably never will be. That’s fine; I’m not trying to run a production shop. I also (obviously) don’t see any need to hide layout lines. These were actually quick-and-dirty layouts for the dovetails; not neatly measured with calipers. I actually like the look of the slight irregularities of handwork sometimes. Besides, it was great practice.

Interior:
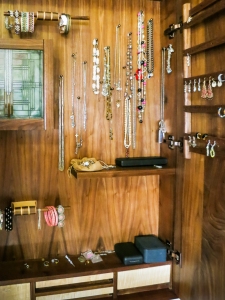
The interior of the cabinet is shelving, drawers, racks for earrings and bracelets, and a small lighted inset display cabinet. The left door has a padded panel for pins and brooches; the right door has the earring racks.
 Earring Racks and Necklace Holders:

The racks are made of 3/4″ x 3/16″ walnut slats, on raised vertical runners. They have notches and holes to hang various types of earrings. This was easy construction – I cut the slats 2″ longer than required to allow for clamping, and cut the notches on the table saw as a bunch. Then I drilled out the holes, and cut the bundle to length.
Problem 2 (anticipated): I guessed right on this one – I made three extra slats, on the thought that they might have a blowout while cutting. There were actually two – one from cutting the notches, and one split while drilling. It was good to have spares on hand.
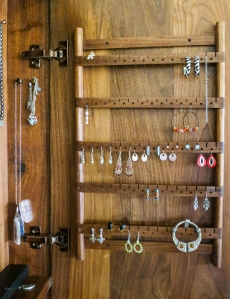
The necklace holders are simple satin-finished pegs (available at Woodcraft or Rockler), treated with Behlen walnut toner. Very easy to install. The downside? They’re *stupidly* expensive – about 8 bucks a pop. But I really didn’t want to use wooden pegs, and scrimping on hardware after this much work makes no sense to me.
The Inset Cabinet
Cathy wanted a place to display her favorite pieces – a flat gold necklace, some rings, and a fine chain pendant. I decided to make an inset cabinet, with interior lighting, customized for these specific items.
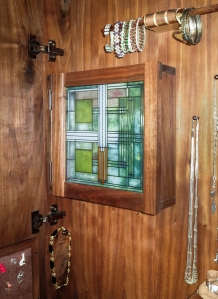
There’s no ‘back’ to the inset cabinet as such; it’s built flush to the back of the cabinet itself. It’s 12″ x 12″, with a piece of reproduction Frank Lloyd Wright stained glass inset in the door (pegged half-lap joinery). The glass is patterned after a skylight in the Willits House, and available through www.mackintoshdesign.com.

Inside the inset cabinet, there is a 25° angled panel with two concentric plywood circles, flocked in black, which hold a flat gold necklace and matching bracelet. On the left, two pegs allow display of a very fine jeweled chain pendant. Ring storage is in padded insets in the lower left. Two motion-sensitive LED lights were installed in the top, and they come on when the door is open and remain glowing about 30 seconds after it’s closed.
The Bracelet Holders:
The two bracelet racks were made by sandwiching some scrap maple and walnut and cutting it into a cylinder. The cylinder had two offset 1/2″ holes drilled through it, and then was cut lengthwise between the holes. 1/2″ walnut doweling was glued in place in each section, and then each was mounted to the maple bracket that mounts it to the back of the cabinet.
Problem 3: Buy a lathe someday <sigh>. Making the cylinder was considerably more difficult than I expected, because I had to work across the grain with a spokeshave to even it up.
The Pin/Brooch Holder:
This one was easy. A simple frame, with a padded inset held in place by at 1/4″ lip, attached low on the left door. Pins and brooches are threaded into the padding.
The Drawers:
Now, the real fun begins. Instead of installing pulls or leaving finger holes in the fronts to open them, I fronted each drawer with a piece of 1/2″ maple, leaving an angled gap at the bottom. This forms the ‘handle’ of the drawer, and shows some nice visual offset with the darker walnut. The dovetails went pretty well – by the time the fourth drawer was done, my time had dropped dramatically, and my results were more consistent. The drawers are flocked in black on the inside, and become storage for everything from opera glasses to necklaces laid flat in the shallower center drawers.
Problem 4: The sides of the drawer were too thick. I really should have made them out of thinner stock, and allowed more space inside each drawer. Also, the maple fronts took up another 1/2″ of depth out of drawers that were only 4″ deep to begin with. If I were to redesign these, I’d start with thinner stock.

Finishing:
The interiors got one coat of Watco Danish Oil. The exteriors (and drawer fronts) got two coats of danish oil, one coat of shellac (as a sealant), resanded, then three coats of Deft spray lacquer and some paste wax. I’m pretty monogamous about finishes – I tend to find one I like and stick with it. I’ve had great luck and wearability with this combination.
Conclusions:
As with all good projects, problems become lessons. This was a great exercise for me in casework, joinery, and design – it’s the first design work I’ve attempted on this scale of complexity.
Between the endless delays, this cabinet took several months to complete. I feel good about the outcome, but it left me with an itch to do a couple of small projects before tackling my next furniture.
Oh, yes: there’s a secret compartment. But no telling, she’d shoot me.
Up next: A miraculous discovery hidden in a piece of wood. Stay tuned.
Ross Henton
February 2014

I got a chance to see this hanging on the wall. Photos do not do justice how impressive and beautiful this casework is.
I told Ross how my wife would love a case like this.
It looks great and the craftsmanship is outstanding.
Nice work, look forward to the next project.
After seeing this case and other pieces he has done, reaffirms my choice in him to mentor me in my journey into woodworking. Thanks…
Dave
great project – i especially like the drawers. I think I will take some cues from you on the bracelet holder for a cabinet I am currently building.